Saturday, October 29, 2011
Rules FAQ: Offering and Accepting Draws
What is The Proper Way to Offer a Draw?
Make your move on the board. Say, "I offer a draw." Press your clock. (Rule 12-2-1)
What Happens if the Proper Procedure Is Not Followed?
Two minutes can be added to the opponent of the player making the improper offer and the offer can still be accepted. (Rule 12-3-4) (I personally believe that this is excessive since the recipient of the improper offer suffers no harm. It is unlikely that this penalty would be imposed in an MSL match. Nonetheless, that's the IHSA rule and you should expect the penalty to be enforced at state and other tournaments. To the best of my recollection, USCF rules do not penalize improper draw offers.)
What if Your Opponent Offers a Draw Before He Moves?
You are entitled to see your opponent's move before making your decisions on whether to accept. If you wish to be polite, you can say "Play your move first." If you don't wish to be helpful, you can simply remain silent until your opponent makes his move. (Rule 12-3-3)
Can Your Opponent Withdraw His Offer?
No. Once the offer is made it cannot be withdrawn. If your opponent offers a draw before making his move and then finds a move that absolutely crushes you, he cannot withdraw the offer. Once he makes the crushing move on the board, you can say "I accept." (Rule 12-2-3)
How Do You Decline a Draw Offer?
There are two ways to decline a draw offer. (1) Make a move. (2) Say "I decline." (Rule 12-2-2)
Should You Ever Decline a Draw Without Making a Move?
NO! If you say "I decline" before you have chosen a move, there is always a chance that you will find upon further reflection that your position is worse than you thought. However, once you have declined the offer you are out of luck. If you are practically certain that you are going to decline the offer, you might wish to say something like "Let me look at it." When, you are ready to make your move, you can also say "I decline" if you wish. There is no reason to orally decline the draw offer before you are ready to make your move on the board.
What Constitutes a Draw Offer?
In addition to "I offer a draw" or "Draw?", any attempt to determine whether an opponent might be interested in agreeing to a draw may be treated as a draw offer. For example, if your opponent says, "Do you think I can win this?" you may respond "I accept a draw." (Rule 12-4)
Can You Offer a Draw After an Offer Has Been Declined?
Making repeated draw offers may be penalized as a attempt to distract your opponent. If a draw offer has been declined, another offer should not be made unless the position has changed substantially or a player has some other reason to think that his opponent might respond differently. (Rule-17-8-1)
Prospect Falls to Fremd (2): Knowing the Score
The result against Fremd could very easily have gone the other way if the players on 4th Board not agreed to a draw. At the time, Prospect's Ekrem Genc had good winning chances against Fremd's Chang. Unfortunately, he was running low on time and he lacked confidence in his ability to play the endgame correctly.

This position is winning for White, but it is going to take some work. After something like 48.b4 Bd2 49.a6, Black can give up his bishop for the a-pawn and b-pawn with 49...Bxb3 50.Rxb3 Rxa6. White's two extra pawns on the other side of the board should be enough to win, but it's going to take a while. With his king in front of the pawns and his rook checking from the side and from behind, Black could have held out for awhile. Nonetheless, given that Prospect needed a win to win the match, Ekrem should have kept playing. On the other hand, the fault does not lie entirely with the player.
A Coaching Failure.
When a match is down to one or two games, IHSA rules allow the coach to give a Communication Card to a tournament steward to give to a player telling him what the score of the match is and the effect that his result will have on determining the outcome of the match. Unfortunately, this did not occur to me until Ekrem was low on time and I did not know what the correct procedure was for going about it. As a result, I had to talk to Mr. Barrett about it and before we could get it figured out, the players had agreed to the draw.
Ideally, a player should always try to apprise himself of how the match stands before he agrees to a draw. IHSA rules also permit a player to have the steward pass a Communication Card to a coach in order to find out how the match stands. Moreover, a player can initiate a communication regardless of how many games are still being played in the match. A player can also get up and look at the match score sheet. However, a player with less than four minutes on his clock cannot reasonably be criticized if he decides that trying to figure out how the match stands is not a wise use of his remaining time.
Mr Barrett and I should have been prepared to communicate the score if the need arose.
Why Game 60 Sucks
Game 60 is a convenient time control if you want to hold a match after the school day ends without getting the players home so late that they can't have dinner and do their homework. G60 is also handy if you want to complete a seven round tournament for the state championship in two days. However, when it comes to developing endgame technique, G60 sucks. On those rare occasions where both sides play well enough to reach an endgame where the result is in doubt, it is even rarer for either player to have enough time remaining to do the position justice. On top of that, players are often so low on time that they quit keeping score in the ending making it very difficult to go over the game and learn from mistakes.
One of the best reasons for joining the United States Chess Federation is to get the opportunity to play in some longer time controls. The Continental Chess Association runs three area events each year, the Chicago Open, the Chicago Class, and the Midwest Class, that use a time control of forty moves in two hours filed by one hour sudden death (40/2, SD/1). That means that each side has up to three hours to complete the game which usually leaves enough time to devote some thought to the ending. The Illinois Open, the Illinois Class, and Tim Just's Winter Open use game in ninety minutes with a thirty second increment (G90 inc 30) which means that thirty seconds get added to each players clock on each move. In a game that goes sixty moves, each side will have two hours. This doesn't always leave time for deep thought in the ending but at least the thirty seconds per move allows the player to keep score for later review. Up in Madison at the University of Wisconsin Chess Club, they occasionally run events with a generous 45/2, 25/1, SD/1.
The downside to the USCF events is that the longer time controls tend to be bigger events with larger entry events. Nevertheless, the key to improvement in all phases of the game is to play slower games.
The Zwischenzug
Despite Ekrem's professed lack of confidence in his endgame skills, he actually found a couple of moves that demonstrate excellent chess thinking. "Zwischenzug" is a German word meaning "in between move." It refers to a quiet move that is played in an otherwise forcing sequence. They are very easy to overlook when calculating variations. Ekrem found a very nice one on his 36th move.

The most obvious move here is 36.Rxb5 when Black will find it very difficult to promote his remaing h-pawn. Running low on time, no one could blame White for playing this move immediately. However, Ekrem saw that 36...Rxc2 threatened both White's a-pawn and f-pawn. He also saw that the Black b-pawn wasn't going anywhere so he played the zwischenzug 36.Re5! driving the bishop away from e1. After 36...Bd2 37.Rxb5 Rxc2, White could play 38.a4 without worrying about his f-pawn. This is the kind of thinking that produces good endgame play.
Basic Endgame Positions
In order to succeed in endings at short time controls, it is necessary to have some of the basic positions down pat such as The Wrong Colored Bishop and Rook Pawn. A lone king can draw against a king, bishop and a-pawn or king, bishop, and h-pawn if the bishop does not control the queening square.

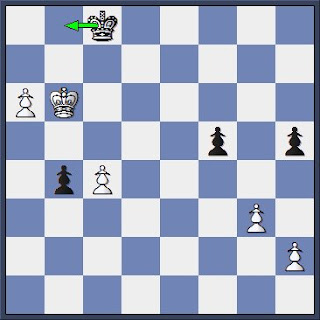
This is the position that White would have had with both rooks and all his pawns gone. It is a draw because there is no way that Black will ever be able to evict the White king from h1. The quick reason that Ekrem should have kept playing is that even if he managed to lose all five of his pawns, all White needed to do was trade rooks in order to reach a dead drawn position.

This position is winning for White, but it is going to take some work. After something like 48.b4 Bd2 49.a6, Black can give up his bishop for the a-pawn and b-pawn with 49...Bxb3 50.Rxb3 Rxa6. White's two extra pawns on the other side of the board should be enough to win, but it's going to take a while. With his king in front of the pawns and his rook checking from the side and from behind, Black could have held out for awhile. Nonetheless, given that Prospect needed a win to win the match, Ekrem should have kept playing. On the other hand, the fault does not lie entirely with the player.
A Coaching Failure.
When a match is down to one or two games, IHSA rules allow the coach to give a Communication Card to a tournament steward to give to a player telling him what the score of the match is and the effect that his result will have on determining the outcome of the match. Unfortunately, this did not occur to me until Ekrem was low on time and I did not know what the correct procedure was for going about it. As a result, I had to talk to Mr. Barrett about it and before we could get it figured out, the players had agreed to the draw.
Ideally, a player should always try to apprise himself of how the match stands before he agrees to a draw. IHSA rules also permit a player to have the steward pass a Communication Card to a coach in order to find out how the match stands. Moreover, a player can initiate a communication regardless of how many games are still being played in the match. A player can also get up and look at the match score sheet. However, a player with less than four minutes on his clock cannot reasonably be criticized if he decides that trying to figure out how the match stands is not a wise use of his remaining time.
Mr Barrett and I should have been prepared to communicate the score if the need arose.
Why Game 60 Sucks
Game 60 is a convenient time control if you want to hold a match after the school day ends without getting the players home so late that they can't have dinner and do their homework. G60 is also handy if you want to complete a seven round tournament for the state championship in two days. However, when it comes to developing endgame technique, G60 sucks. On those rare occasions where both sides play well enough to reach an endgame where the result is in doubt, it is even rarer for either player to have enough time remaining to do the position justice. On top of that, players are often so low on time that they quit keeping score in the ending making it very difficult to go over the game and learn from mistakes.
One of the best reasons for joining the United States Chess Federation is to get the opportunity to play in some longer time controls. The Continental Chess Association runs three area events each year, the Chicago Open, the Chicago Class, and the Midwest Class, that use a time control of forty moves in two hours filed by one hour sudden death (40/2, SD/1). That means that each side has up to three hours to complete the game which usually leaves enough time to devote some thought to the ending. The Illinois Open, the Illinois Class, and Tim Just's Winter Open use game in ninety minutes with a thirty second increment (G90 inc 30) which means that thirty seconds get added to each players clock on each move. In a game that goes sixty moves, each side will have two hours. This doesn't always leave time for deep thought in the ending but at least the thirty seconds per move allows the player to keep score for later review. Up in Madison at the University of Wisconsin Chess Club, they occasionally run events with a generous 45/2, 25/1, SD/1.
The downside to the USCF events is that the longer time controls tend to be bigger events with larger entry events. Nevertheless, the key to improvement in all phases of the game is to play slower games.
The Zwischenzug
Despite Ekrem's professed lack of confidence in his endgame skills, he actually found a couple of moves that demonstrate excellent chess thinking. "Zwischenzug" is a German word meaning "in between move." It refers to a quiet move that is played in an otherwise forcing sequence. They are very easy to overlook when calculating variations. Ekrem found a very nice one on his 36th move.

The most obvious move here is 36.Rxb5 when Black will find it very difficult to promote his remaing h-pawn. Running low on time, no one could blame White for playing this move immediately. However, Ekrem saw that 36...Rxc2 threatened both White's a-pawn and f-pawn. He also saw that the Black b-pawn wasn't going anywhere so he played the zwischenzug 36.Re5! driving the bishop away from e1. After 36...Bd2 37.Rxb5 Rxc2, White could play 38.a4 without worrying about his f-pawn. This is the kind of thinking that produces good endgame play.
Basic Endgame Positions
In order to succeed in endings at short time controls, it is necessary to have some of the basic positions down pat such as The Wrong Colored Bishop and Rook Pawn. A lone king can draw against a king, bishop and a-pawn or king, bishop, and h-pawn if the bishop does not control the queening square.

This is the position that White would have had with both rooks and all his pawns gone. It is a draw because there is no way that Black will ever be able to evict the White king from h1. The quick reason that Ekrem should have kept playing is that even if he managed to lose all five of his pawns, all White needed to do was trade rooks in order to reach a dead drawn position.
Friday, October 28, 2011
Prospect Falls to Fremd (1): Revisiting the Fried Liver Attack
After winning the Mid-Suburban League conference tournament last year and finishing 18th at state, Prospect had high hopes for this season, but the competition is proving very tough. On Thursday, Prospect fell to Fremd 36.5 to 31.5. Robert Moskwa on 1st Board and Mike Monsen on 3rd Board continued their winning ways and Prospect got its first win on 8th Board from Brett Abraham. Unfortunately, Ekrem Genc's draw on 4th Board left Prospect short.
Happily for me, there are many teachable moments to blog about:
Defending Against 1.e4 e5 2.Nf3 2.Nc6 3.Bc4.
The most natural response to 1.e4 is 1...e5. After the equally natural moves 2.Nf3 Nc6, White has the choice of several systems. One of the sharpest is 3.Bc4 which immediately targets f7 which is Black's weakest square.

The Two Knights Defense
Based on my experience the most popular response among high school players is 3...Nf6 which is known as the Two Knights Defense. The most popular move for White is then 4.Ng5. This violates the basic opening principle (or maybe just rule of thumb) which says that no piece should be moved twice until every piece is moved once. In this case however, the violation is justified by the fact that Black has no easy way to defend f7 against the dual threat of the knight and the bishop.

Black can if he wishes ignore the threat with 4...Bc5 which is known as the Traxler Gambit. This is very exciting, but completely sound. The recommended move is 4...d5, which blocks the bishop's attack on f7. However, Black faces another choice after 5 exd5.

Practice has shown that Black's best move here is the odd looking 5...Na5. This move also moves a piece twice when other pieces haven't moved once. On top of that, it places a knight on the edge of the board.

While the Two Knights with 5...Na5 is considered a perfectly sound approach, it is tough to play without a decent level of book knowledge It seems to me that it is an openings where the common opening rules of thumb (like not placing a knight on the edge of the board) get violated more often than usual. One main continuation goes 7.Bb5+ c6 8.dxc6 bxc8 9.Qf3.

These are not the easiest moves to find over the board in a sixty minute game if you haven't seen them before.
The Fried Liver Attack.
After the more natural looking 5...Nxd5, White has the option of playing the Fried Liver Attack where White sacrifices a knight for a pawn with 6.Nxf7 in order to expose the Black king and draw it out to the middle of the board. Apparently the name derives from the fact that Black frequently winds up as dead as a piece of liver.

The Fried Liver Attack is not necessarily winning for White but it is not easy for Black to defend after 6...Kxf7 7.Qf3+ when Black is forced to play 7...Ke6 in order to defend the knight on d5.

One possible continuation is 8. Nc3 Ncb4 9. Qe4 c6 10. a3 Na6 11. d4 Nac7. However, 6.d4, delaying the knight sacrifice may actually be a better move for White. This allows White to add his other bishop to the attack quickly and it turns out that Black doesn't have anything that particularly improves his defensive chances. For example 6...Be7 7.Nxg7 Kxg7 8.Qf3+ gives White a revved up Fried Liver.
The Italian Game
In the ten years that I have been coaching at Prospect, I may have seen the Fried Liver a dozen times in matches. To the best of my recollection, Black won most if not all of them. So what is Black to do if he doesn't want to allow the Fried Liver and he doesn't want to have to find a lot of counter-intuitive moves after 5...Na5? I've seen some players go for 3...h6 to prevent 4.Ng5, but neglecting development isn't a good idea. My preference is simply 3...Bc5 leading to the Giuoco Piano aka the Italian Game.

Now 4.Ng5?? simply loses the knight to 4...Qxg5. If White plays 4.0-0, after 4...Nf6, Black can meet 5.Ng5 with 5...0-0.
3...Bc5 doesn't eliminate the possibility that White may sacrifice material to get a nasty attack. 4.b4 is the Evans Gambit which can be very tricky to handle. However, White often plays more quietly with 4.0-0 or 4.d3 and even if he chooses a more aggressive line, overall I think opening principles are violated much less frequently than in the Two Knights.
To sum up: After 1.e4 e5 2.Nf3 Nc6 3. Bc4
- The Two Knights Defense 3...Nf6 is perfectly sound however after White's most common move, 4.Ng5, Black is likely to wind up in tricky positions that are hard to play without some prior study.
- 3...Bc5 is also perfectly sound and the odds of Black reaching a position that requires less book knowledge is much greater.
Friday, October 14, 2011
White to Play and Win

This position occurred on 7th Board in the Prospect-Hoffman match. What should White have played?
Thursday, October 13, 2011
Prospect v. Hoffman: An Important Drawing Technique
Prospect lost for the first time this season to Hoffman Estates, 46-22. Prospect had winning chances on 4th and 7th Boards and drawing chances on 3rd and 6th, but was unable to convert.

The drawing chances on 6th came in a position similar to this. If White is to move here, he wins easily with 1.Rd6+. However, if it's Black's move, he draws with 1...Qc3+ 2.Kb1 Qb3+ 3.Kc1 Qc3+. White has no way to escape the queen checks as long as Black keeps his queen on the same file as the White queen. Unfortunately, in the match White played 3...Qa3+? which allowed the White king to get to safety with 4.Kd2.

The drawing chances on 6th came in a position similar to this. If White is to move here, he wins easily with 1.Rd6+. However, if it's Black's move, he draws with 1...Qc3+ 2.Kb1 Qb3+ 3.Kc1 Qc3+. White has no way to escape the queen checks as long as Black keeps his queen on the same file as the White queen. Unfortunately, in the match White played 3...Qa3+? which allowed the White king to get to safety with 4.Kd2.
Tuesday, October 11, 2011
Is It Safe?
Hey! You guys on the lower boards . . .
STOP HANGING YOUR PIECES!!!!
Ahhh . . . It felt good to get that out of my system.
There are very few players in the Mid-Suburban League who do not hang a piece from time to time, but the players on the upper boards do it much less frequently than the players on the lower boards. When a 1st or 2nd Board hangs a piece it is usually because he overlooked an attack on his piece. when a 7th or 8th Board hangs a piece, it is often because piece safety is not a habitual part of his thought process. The 7th or 8th Board may be perfectly capable of figuring out whether a piece is safe or not, but he only bothers to do so intermittently.
As usual, my favorite source of advice is Dan Heisman's Novice Nook column at ChessCafe.com I recommend reading The Safety Table.
Sunday, October 9, 2011
Prospect v. Palatine: Pieces Before Pawns
Prospect beat Palatine 57-11 in its second match of the season. Although normally one of the toughest teams in the conference, Palatine lost many of its upper boards from last year to graduation.

It's always nice when a principle I write about in one post is perfectly illustrated in a game from the next match. In my last post, I stressed the need to improve the position of pieces before pushing pawns in the endgame. That principle arose again on third board where Palatine's Karan Patel had White against Prospect's Ekrem Genc. At first glance, it appears that the Black rook can pick off the White pawns at its leisure, however, White can still draw the game with 46.Kf4! After 46...Rg8 47.Ke5 Rxg7 48.Kd5 Rb7 49.Kc5, the White king has just enough time to protect the b-pawn. Since the Black king is to far away to help, the game will be drawn after Black is forced to give up his rook to stop the pawn from queening.
In the game, however, White pushed with 46.b6? which leaves the White king with insufficient time to come to the aid of either of the pawns. White lost after 46...Rg8 47.b7 Rxg7+ 48.Kf4 Rxb7.
Wednesday, October 5, 2011
Endgames: Position Pieces Prior to Pushing Pawns
The most common mistake I see players on the lower boards make in the endgames is pushing pawns before their pieces are in a position to support the advance. Sometimes the game does come down to a race between unobstructed pawns, but I think it is much more common that a pawn will need support to advance. A player should always ask himself whether he needs to improve the position of his pieces before pushing a passed pawn.

This position occurred on 5th Board in the Conant match. White has an extra passed a-pawn, but all three of Black's pieces are well positioned to oppose its advance. The only piece supporting the pawn is the White rook, but since it is front of the pawn, it will have to move off the a-file in order for the pawn to reach the queening square at which point the pawn will be completely unprotected. Since the a-pawn is perfectly secure on its present square, White's first priority should be to get his king and knight involved in the game. Bringing the knight to c4 via e3 is one obvious plan.

The game eventually reached a king and pawn ending. The winning technique here is for White to get his king in front of his pawn with 57.Kg5 Kf7 58.Kh6 Kg8 59.Kg6 Kh8 60.g5 Kg8 61.Kh6 Kh8 62.g6 Kg8 63.g7 Kf7 64.Kh7 and the pawn queens. After 57.g5, which White played, Black should have been able to draw with 57...Kf7 58.Kh5 Kg7 59.g6 as long as he remembered that Straight Back Draws 59...Kg8 60.Kh6 Kh8 61.g7+ Kg8 62.Kg6 stalemate.

This endgame occurred on 6th Board against Conant. It should be a fairly easy win for Black. In an open position with pawns on both sides of the board, the rook is a much stronger piece than the knight. All Black needs to do is to find a square for the rook that maximizes its attacking capabilities. Any square on the 2nd rank would give the rook many targets. 26...Re1 is a logical way to start.

Unfortunately, Black chose to advance pawns instead. Rooks are much better at attacking than defending. Even after several pawn moves, Black still could have gone on the offensive with 32...Rd2.
In this final position, the Black pawn doesn't need any support, but Black still needs to improve his piece before pushing it. In the game, Black played 50...b3? and lost after 51.a7 b2 52.a8=Q+ Ke7 53.Qa2. Black could have won with 50...Kb8! 51.a7+ Ka8 52.c5 b3 53.c6 b2 57.c7 b1=Q+.

This position occurred on 5th Board in the Conant match. White has an extra passed a-pawn, but all three of Black's pieces are well positioned to oppose its advance. The only piece supporting the pawn is the White rook, but since it is front of the pawn, it will have to move off the a-file in order for the pawn to reach the queening square at which point the pawn will be completely unprotected. Since the a-pawn is perfectly secure on its present square, White's first priority should be to get his king and knight involved in the game. Bringing the knight to c4 via e3 is one obvious plan.

The game eventually reached a king and pawn ending. The winning technique here is for White to get his king in front of his pawn with 57.Kg5 Kf7 58.Kh6 Kg8 59.Kg6 Kh8 60.g5 Kg8 61.Kh6 Kh8 62.g6 Kg8 63.g7 Kf7 64.Kh7 and the pawn queens. After 57.g5, which White played, Black should have been able to draw with 57...Kf7 58.Kh5 Kg7 59.g6 as long as he remembered that Straight Back Draws 59...Kg8 60.Kh6 Kh8 61.g7+ Kg8 62.Kg6 stalemate.

This endgame occurred on 6th Board against Conant. It should be a fairly easy win for Black. In an open position with pawns on both sides of the board, the rook is a much stronger piece than the knight. All Black needs to do is to find a square for the rook that maximizes its attacking capabilities. Any square on the 2nd rank would give the rook many targets. 26...Re1 is a logical way to start.

Unfortunately, Black chose to advance pawns instead. Rooks are much better at attacking than defending. Even after several pawn moves, Black still could have gone on the offensive with 32...Rd2.

In this final position, the Black pawn doesn't need any support, but Black still needs to improve his piece before pushing it. In the game, Black played 50...b3? and lost after 51.a7 b2 52.a8=Q+ Ke7 53.Qa2. Black could have won with 50...Kb8! 51.a7+ Ka8 52.c5 b3 53.c6 b2 57.c7 b1=Q+.
Subscribe to:
Posts (Atom)